On Life and Traveling … Part 1

23 Jun

Seems as though I’m always coming back to my blog to ask for forgiveness for not being here. This time, I won’t ask for forgiveness. I think you’ll understand my absence.

So, where have I been? I guess the real question would be: Where haven’t I been?

My new life journey started back in February. The foodie bf and I cleaned house, sold a lot of stuff, packed our bags and headed out to explore the world without any set itinerary, time frame, set locations, or definite plans. Most thought we were crazy. Most didn’t understand. Most wanted to know when we were coming back “home.” Some even pressured us to stay. And few and far between, you would find the ones who said, “You’re only young once.” “You don’t have kids, go for it!” “If you can do it, do it!” or “I wish we could do that!” Despite the pressures and the butterflies … off we went.

Before we could leave a few “necessities” were in order. A high quality tent would be our new home. Sleeping pads and a very cool double sleeping bag became our new bed, and a fine selection of cooking utensils, pots and pans, and gas backpacking stoves became my kitchen. Conveniently, each pot and pan, plate, cup and utensil is made to pack inside the other and weighs literally nothing. These items would become my new favorite things. One thing that I personally overlooked was the headlamp, which turned out to be one of our biggest necessities. Thanks to the foodie bf, we had two! It gets dark quickly outside when you’re depending on natural light. Other important items … baby wipes, warm clothes, flip flops for showers, a cooler to serve as a refrigerator and granola. The foodie bf is also an avid rock climber and we had made “plans” to climb as much as possible on this journey. Needless to say, we had a good amount of climbing gear with us, too.

With the car packed, we headed out early in the morning mid-February set for Atlanta to get my brand new hiking backpack “fitted” at the REI. We visited with some friends and family along the way and eagerly anticipated heading west. I’m not too sure the foodie bf was confident in my promised camping skills so we made a three/four day pit-stop in Alabama to “practice.” I’m not sure if it was my excitement or my eagerness to be successful on this adventure, but even a night in the car and then three days of pouring rain in the tent didn’t stop me. In between the downpours, we made a camp fire, cooked spaghetti in our new “kitchen,” found time to chase a turkey down the road, learned you could steal wi-fi from neighboring lodges, and narrowly escaped a tornado. Yes, I said “narrowly escaped a tornado.” Sirens going off and everything. On our way out, we learned there was a “Jig” competition for St. Patrick’s Day at the park lodge. Dance the best jig and win a weekend stay in one of their cabins … if we could have only stayed until March 17th.

After Alabama we made a quick ride through Mississippi and found ourselves at a casino in Shreveport, LA. This would be my first casino. I found a great deal on a hotel on one of those daily deal websites, so we decided to have a bit of fun. Dinner proved to be costly and not nearly as good as my spaghetti cooked by camp fire and I quickly realized that the fresh air of my tent was far more appealing than the stuffiness of a casino/hotel. Needless to say, I enjoyed the gambling and did fairly well on the slot machines. It was a break even weekend.

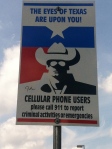
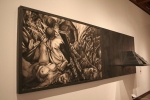
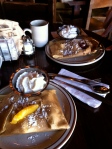
Leaving Louisiana, we stopped off in Texas to have Bella’s oil changed at Park Place Porsche. These people were awesome and had one of the nicest service departments. After Bella was washed and ready to go we hit the road towards Santa Fe, MN. A couple nights sleeping in the car at rest stops, which by the way is actually pretty comfortable when you have the sleeping pads and sleeping bag, and we were finally there. We encountered our first snow of the trip in Santa Fe. Conveniently, I was driving. I’ve never driven in snow, so this was an adventure for me. Foodie bf is from Alaska and had to hold back laughter every time I would scream, “Look how big that flake is!” or “Look, the snow is sticking!” Poor guy, he’s a good sport! In Santa Fe, I found a really cute hotel that is made of about 30 different pueblos. Each one had its own wood burning fireplace, unique artifacts and colors. We spent one night in Santa Fe, but were able to explore the city, have lunch at a French Pastry Shop, tour the Santa Fe Art History Museum, shop at the Indian market and take an exorbitant amount of pictures. It was cold, I got to wear a scarf, and ended up taking home a huge french baguette.

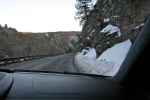
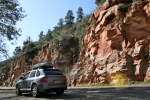
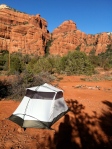
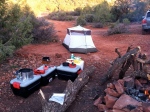
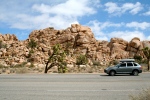
After Santa Fe, I convinced the foodie bf that we really needed to visit Sedona, AZ. This would turn out to be one of my favorite spots. We drove into town from Flagstaff along a beautiful winding mountain road covered in snow and surrounded by unbelievable red rocks. The first night we were lucky to get one of the last available spots in the area’s campground. We paid about $15.00 for the night and bought a $6.00 bundle of wood from the camp host. We had a fire, cooked some dinner and headed to bed. We had seen lots of signs for off-road adventures, so the next morning decided we would stop in a shop to learn more. Come to find out, we can take Bella off-roading through some of these beautiful red rock areas and can even stop and tent camp for free! Who knew? So we packed a lunch and headed out to the trail. Simply put, this was probably my favorite day to that point. Bella performed wonderfully over some huge rocks! For the most part, the foodie bf drove but on some of the more simple areas, I took a turn and had a blast. We found an amazing camping spot along the trail overlooking some amazing rocks and decided to stay for a few days. I ran into town to grab some groceries and we were all set. The foodie bf made us a huge campfire and I got a considerable amount of computer work done sitting on a huge log next to the fire. That my friends is living.

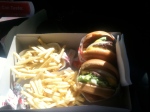
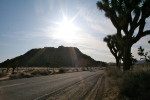
We spent a few days in Sedona and then decided to get a move on towards California. Our goal was to get to Joshua Tree National Park, also known as rock climbing Mecca, and max out their two week maximum stay. Along the way, I experienced my first In and Out burger, slept in a few more rest areas, and drove through hundreds of miles of desert. Finally, we had arrived. Joshua Tree held a special place in the bf’s heart as he had spent a considerable amount of time here earlier in his life, and from the stories he had told me, I anticipated J-Tree to be like heaven on earth. So, when we arrived early evening to a 40+ mph sand storm and near freezing temperatures, I was a little confused. There are many different camping areas within the park, but “Hidden Valley” is the most popular with climbers because of the number of great climbs close by. We were lucky to find a spot in Hidden Valley. However, we should have slept in the car that night. Instead, we decided to try and pitch the tent in 40 mph winds. At one point, the tent actually picked me up while I was holding it … literally, off the ground. Once we had the tent standing and huge rocks placed on top of the stakes to ensure they didn’t come out of the ground, we quickly realized the wind was blowing so hard, sand was coming through the mesh and was creating a lovely sandbox inside our home. The foodie bf was a doll and slept in the tent to ensure it stayed with us, I on the other hand slept in the car!

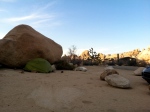
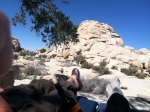
We ended up staying in Joshua Tree for a little over two weeks. So much happened while we were there. There were days where we did nothing at all, days were we climbed multiple climbs a day, days were we took a bottle of wine and some snacks and found a rock in the middle of nowhere to relax on all day, so many different things. We had lots of sunshiny days, a few days of snow, and a couple nights where the wind rivaled the first night. It was certainly entertaining. We also met some really wonderful people in Joshua Tree.

I guess the biggest obstacle for me in Joshua Tree was overcoming the fear of climbing in front of other people who obviously are better climbers than me. Rock climbing is a scary thing and its definitely not easy. You have to place a lot of trust in your climbing partner and you have to be very aware of yourself and your surroundings. The simplest move or mistake could cause you to fall or die. Pair that with the fact that this is “climbing Mecca” and there are hundreds of climbers watching and waiting for their turn to climb the route you’re on … and my self consciousness was out in rare form. Shallowly, my only saving grace was that I loved my climbing clothes and climbing gear and really felt like I “looked the part.” In hindsight, I probably didn’t look the part at all … real climbers actually look like they’ve USED their gear! ha ha …

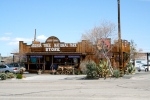
The other entertaining part to Joshua Tree is taking a shower. There is this adorable store in town where they sell all kinds of climbing gear, souvenirs, fire wood, and shower time. $6 bucks gets you about 8 minutes of hot water. Try sharing a shower with someone and only getting 8 minutes of hot water! The idea here is to wash everything as quickly as possible and then stand in the water until it runs out. The opposite of what I would do at home. The showers were super clean, but it did feel a little bit like what I would imagine summer camp to be like for a kid. The grocery store (and the showers) were about 20 minutes away from our camp, so we tried to only come into town once a week. All-in-all, I really enjoyed Joshua Tree but still think the climbers there are pretty intimidating.

By this point, we have been living in a tent for a little more than a month for the exception of our stay at the casino in Shreveport and the pueblo in Santa Fe. Surprisingly, living in a tent is pretty comfortable. You develop a routine of how you set up the tent, what you put in there so you’re not too crowded, how you arrange your shoes, wood and cooler in the vestibules, etc. You become accustomed to going to bed with the sun and waking up with the sun. Plus, we were active throughout the day, so when you come home to the tent you’re ready to eat, relax and sleep. There was very little cell phone service in the park and that made life very relaxing too. It’s incredible when you learn you don’t actually have to check Facebook every time you look at your phone … it’s all still there later. I really enjoyed our time in Joshua Tree.

So, that’s Part 1 …. considering I wrote a mini book here. Here’s a couple pictures from this leg of the journey.

Sorta Kinda Half Way Back …

5 Nov

And, I’m back.  Seems as though I only come around here anymore to apologize for not being around.  Things have been super busy in my life the last month or so – between work and work, I have little to no time to cook let alone blog about it.  Dinners lately have been pretty normal {hot dogs, mac and cheese, packaged frozen meals, etc} Except for this last week … I don’t know what got into me, but I made some pretty decent meals.  There has been grilled quail with asparagus and red potatoes {small recipe to follow}, rosemary and garlic lamb chops with couscous and peas, and then a whole chicken which soaked in a citrus-rosemary brine {recipe to follow} served with mashed potatoes and corn.  Not too shabby if I do say so myself.


So… let’s talk about red potatoes.  I saw this recipe online where the person took the potatoes and grilled them on the grill while cooking their meat.  I wanted to try this, but put my own take on it.  They turned out great {cooked a little too long, but still wonderful} but I love potatoes no matter how they are served.  I took some petite red potatoes and halved them then boiled them for just a few minutes.  I wanted to make sure they weren’t going to be too hard when they came off the grill.  After letting them boil for just a few minutes, I drained them and added a little butter and salt.  I then made an envelope out of tin-foil and put all the potatoes in there with a branch of rosemary and some sliced garlic pieces.  They went on the grill with the quail for about 15-20 minutes and where GREAT.


As for the chicken.  Check out my earlier post about the “Thrifty Chicken in a Bath” … that was my first experience with a brine.  I basically followed the recipe but replaced tarragon with rosemary.  I also threw in the rind from one whole orange and then added the juice I squeezed out of the orange as well.  Everything else – the same.  I’m not sure if it is really the reason, but the chicken had a great crust this time and I’m wondering if the citrus had anything to do with it.  Anyhow – it was great too.  Really juicy.


This weekend is a little slow.  Perhaps a cooking experiment is in order.  Night ya’ll.

Bless Me Bloggers …

20 Sep

I feel like my recent blog posts should start with “Bless me bloggers, it has been ___ day’s since my last cooked meal!” … There has been grilled cheese and tomato soup, cottage cheese and tomato basil wheat thins, pizza, McDonald’s and one of my favorites – french bread, cheese and dried salami – but nothing home made or delicious in any way.  Until this past weekend!  We went to a local festival dedicated to Shrimp and Grits and had the most amazing food!  I used to love shrimp when I was a child but somewhere along the line I stopped eating it by the bowl-full and only ordered it at Bonefish (bang bang shrimp are to die for) and grits are not a favorite of mine either… I don’t mind the taste, but the texture makes me want to gag.  However, the shrimp and grits we had at this festival were just simply amazing!  I was able to get a recipe from the winners from last years festival, and I can’t wait for an opportunity to try this recipe out.  Between the butter, the cheese, the whipping cream and others … I may gain 10 pounds in one sitting, but hey – It’ll be worth it!!! Until next time …

Heat and Pour Frosting – Deliciousness!

12 Sep

This week has been crazy.  Crazy in a good way.  But, crazy in a good way is bad for my cooking … or lack there of this week.  I think we’ve had McDonald’s twice, a rotisserie chicken that made two meals and my staple “what’s for dinner” meal – spaghetti.  BUT, I did make some pretty damn good yellow cake!  And yes, it was straight from the box.

I was walking up and down the aisles at Harris Teeter wondering what I would make for dinner …  {Sometimes I think that’s the best way to find dinner} … and I came across an end-cap filled with frosting.  A new kind of frosting that looks like it is in a chocolate syrup bottle that you heat up in the microwave and pour over your cake.  No longer do you have to wait for the cake to cool completely … gone are the days of ripping off the top layer of cake or having crumbles stuck in your frosting… wahoooo!  Here is my beautiful work of deliciousness.

{Amen}

And here is the bottle of yummy goodness.

Thank you Duncan Hines for making my cake so delicious!  Ya’ll have fun with this one… I’m going to go heat the leftover frosting and find some strawberries! Night!

Fish Tacos on a Paper Plate Kinda Night

1 Sep

We had company over the weekend and into the early part of this week.  Company is always fun to cook for because you try to find things that they like and that will be great conversation food … keeping you at the table longer for chats!  We also went to the beach for most of the day and wanted something fresh and light.  Fish tacos where suggested – recipe was found online – shopping was done – and cooking started! {Brilliant idea by the way}

Let me start by saying, my photos are random at best.  I was talking, cooking, drinking, etc… I snapped pics when a good photo-op hit me in the face!  Secondly, if you have a “beer batter” that you like to use on fish … use that.  Otherwise you can follow the directions below for batter.  We had a box of beer batter that we like to use.  And we use MGD as the liquid.  Makes it authentic!!!

To make the beer batter:  In a large bowl, combine 1 cup all purpose flour, 2 tablespoons cornstarch, 1 teaspoon baking powder, and 1/2 teaspoon salt. Blend 1 egg and 1 cup beer {Miller Genuine Draft is the best!} then quickly stir into the flower mixture.  Don’t worry about a few lumps. {Remember: You can bypass this whole step if you have a batter you like to use that comes out of a box}

To make the most wonderful white sauce you have ever tasted … follow these directions: In a medium bowl, mix together 1/2 cup plain yogurt and 1/2 cup mayonnaise.  Gradually stir in fresh lime juice until consistency is slightly runny.  Season with 1 teaspoon minced capers {which I hate, but you can’t taste them in this sauce}, 1 jalapeno pepper minced, 1/2 teaspoon dried oregano, 1/2 teaspoon cumin, 1/2 teaspoon dill weed and 1 teaspoon ground cayenne pepper. {Delish – I’m going to have to find another use for this sauce. It really was great!}

Now, to get to the fish. We used about 1 pound of Cod fillets, fresh from the butcher.  I’m sure you could use some frozen Cod, thawed.  We cut them up into long narrow strips.  You could also do small chunks if you wanted.  Heat oil or your deep fryer to approx 375 degrees.  Dip the fish into the beer batter and fry until crisp and golden brown.  Drain the grease from the fish on paper towels.

{This is where I should have a lovely picture of a pile of fried fish!}

In the meantime, you want to heat up some corn tortillas in a fry pan.  They taste so nice after they have been heated up and fried a bit with some oil in the pan.  When you’re ready to serve … place friend fish in the tortillas, top with shredded cabbage and some cheese then top with the white sauce. {Mmmm. I’m thinking this should be served for dinner again tomorrow.} It looks something like this – served with black beans.

Don’t hate. It was a paper plate kinda night. I’m telling you though – – Fish Tacos – – Amazing!  And, I’d love to hear about it when you make them.  I hope they bring all kinds of chats to your dinner table!  Night Ya’ll!

Thrifty Chicken in a Bath

23 Aug

I learned a lot of things today: {one} a whole chicken only costs $4.00 {two} I can easily cut out the backbone of a chicken with scissors {three} a brine is a salt water mixture used to keep moisture in the meat you are cooking {four} zucchini can be left to saute/wilt for a long time and it still tastes good {five} the recipes that say they are $10.00 meals are only $10.00 meals if you have all the spare ingredients that they need, otherwise they are $20.00 meals.

How in the world did I learn all these lessons in one day?  Well, it’s quite easy.  I was watching food network last night and got inspired to chop a backbone out of a whole chicken because the B*#!& made it look so darn easy.   Simple as that.  {Really, she was teaching me how to use a brine on a chicken and pan-roast it until it’s quite delish and juicy!} I highly recommend this recipe to you all.  It was really easy, made me feel like I was really “cookin” and tasted quite delicious when it was finished… And, if you have all the spare ingredients {tarragon, white wine, onions, etc..} then it may really cost you under $10.00 for dinner! {And that my friends would be a huge success!}

Let’s start with the ingredients. You will need:

1 – 3 to 4 pound chicken

1/2 cup of kosher salt

1/2 cup of brown sugar

4 cups hot water

1 small onion, chopped (big pieces are fine)

1 tablespoon of whole peppercorns

2 sprigs of fresh tarragon, chopped (big pieces are fine)

2 cloves of garlic, smashed (I love garlic and used 4-5 cloves)

4 cups ice water

1/2 cup white wine

3 tablespoons of olive oil

First, you want to create the brine.  To do that, take the hot water and add the sugar and salt and stir until dissolved.  Once it is dissolved, add the onion, garlic, tarragon, peppercorns, and white wine.  Give it a quick whisk.  Add the ice water.  You do not want the mixture to be hot at all when you add the chicken.  Set this aside.

While that is cooling off … it’s time to clean up our chicken.  You’re going to want to clean it off, take the nasty stuff out of the inside and then lay it flat on a cutting board breast side down.  Take a good pair of kitchen scissors and cut down both sides of the backbone detaching it from the chicken.

Then you will submerge your chicken in the brine.  I read somewhere if your chicken starts to float, you can add a ziplock back full of ice.  Mine wasn’t really floating, but I thought it would be fun and ‘safe’ to do that step too.

This goes in the fridge for an hour.  This is what I did while I was waiting for my chicken to finish it’s bath …..

After you chicken is done bathing … it’s time to fire up the pan and preheat the oven to 400 degrees.  You want to get your pan nice and hot and then add the 3 tablespoons of olive oil.  Before you lay the chicken in the pan you want to lay it breast side up on a cutting board and break the breast bone so the chicken lays as flat as possible.  You will also want to blot the chicken off with a paper towel to absorb as much moisture as you can.  Then you want to find a really heavy pot/pan, a cast iron pan or a brick covered in tin foil to pay onto of the chicken … The idea here is that you are going to get the maximum surface area pressed down in your hot pan in order to make the skin as crispy as possible.  Place the chicken breast side down in the pan for 8-10 minutes on med/high heat.  Here is my ghetto “press” …

And here is what my chicken looked like when I flipped it over after 10 minutes:

Once you get a good crust … place the chicken (breast side up) in the oven for 20-25 minutes or until the temperature reaches 160 degrees.  Make sure you let the chicken rest for about 10 minutes before you cut into it … I could hardly wait that long.  I served mine with red potatoes and sauteed zucchini and onions.  Everything turned out delicious.  I will say that I was surprised that you could not taste the ‘brine’ as much as I thought you’d be able to.  It smelled so strong with the tarragon and the onion and garlic that I thought for sure the seasoning would be overpowering but it wasn’t in the slightest.  Very mild actually.

Anyhow, I hope you enjoy the recipe and try it out for yourself … I’m sure it was a good laugh for those of you who know me to picture the visual of me chopping up a chicken… but it was worth it – and fun to boot!  Night ya’ll!

Kabobs on the Barbie …

20 Aug

I was sure that my chili from last night would make it as leftovers for dinner tonight … but after eating it as a midnight snack and having a bowl for lunch … a night off from having to decide what was for dinner was nowhere in sight.  So, like any good woman would do, I waited until 6:30pm to survey my options.  Yeah, nothing.  Off to the grocery store with the bright idea of having grilled kabobs and baked potatoes.  Needless to say, the series of late afternoon summer thunderstorms have not left us … and as soon as I got halfway to the grocery store the heavens opened up.  Funny thing about where I live, it can be raining buckets in one area and then drive home and it be dry as a bone.  Thankfully, this was the case tonight.  I didn’t do anything special.  I purchased some pre-made kabobs from the butcher and popped some potatoes in the microwave.  Only thing extraordinary was the bacon I cooked to make into bacon bits for the potatoes.  Geesh, I’m amazing! Anyhow … I didn’t snap any pictures because I was too concerned with getting dinner on the table before the heavens opened up a monsoon over our BBQ.  So, thanks to google, you have an idea of what my dinner looked like.  Night ya’ll!

Chili Warms the Soul

19 Aug

It’s pouring rain here tonight. Last night we had some serious storms … horizontal rain … which I got to drive in on the way home from a meeting. I can barely see to drive in the dark, let alone horizontal rain and whipping winds. Needless to say, I thought a traffic signal or tree were surely going to come flying in my window at any point.  Anyhow, this little story is just to explain why I want to make a big pot of chili in the middle of the summer.  It’s perfect for this rainy night.  This is the recipe I used: Read my chili blog here.  But, I used 2 pounds of meat. I also had the wonderful “fortune” of trying to find eggs in the middle of an egg-recall. You’d think the grocery store would have a list of the ones NOT to buy … but no.  So, I bought two kinds and said a little prayer that when I got home the factory numbers would be ok.  They passed.  The eggs were needed for the corn muffins in case you were wondering how I was using eggs in my chili. {ha} Anyhow… enjoy ya’ll! Have a great night!

Emulsifying? Ehh… Boiling Butter!

16 Aug

I believe I have blogged about this dinner once before, but driving home tonight from work I had an instant craving for lamb chops. Perhaps it was the documentary I watched last night about sheep and a family of herders who traveled with their sheep through some valley…. my mind is a little weird.

Anyhow. Tonight I made Garlic and Rosemary Lamb Chops, Red Potatoes and Asparagus. It was pure deliciousness. And even better was the fact that usually I put them in the broiler, but the foodie bf grilled them for me … yum! Basically, i cut up a few twigs of rosemary and a few pieces of garlic, salt and pepper and then poured in some olive oil. I put it all in a ziplock bag and let them marinate as long as I could wait. Here’s a look at said “marination” ….

I know it looks a little disgusting, but trust me it’s amazing.  So … I let this sit for a while {really only about 45 minutes, but that’s as long as I could wait … and even that was torture for a girl who had only had a piece of leftover pizza all day} and then made some red potatoes – boiled – while they were draining, I coated the bottom of the pot with butter and salt and then threw the potatoes back in to soak up the goodness!  I also made steamed asparagus but instead of pouring out the little bit of extra water… I boiled some butter {I guess it’s called emulsifying} and poured it over them. {yummy, but not diet food}

Here’s the meat:

And here’s the finished product …. If you need better instructions, just ask! Enjoy ya’ll

Beef Stroganoff Picture Tutorial

13 Aug

It is so like me to wait until I’m in the grocery store parking lot {waiting out the late afternoon typhoon pouring down from the heavens to pass} to pull up a recipe for Beef Stroganoff on my phone, write down the ingredients and have the bright idea that this would be a good meal for dinner … tonight … at 8:30pm. Who does that? Anyhow, I got home a little bit later and got to work chopping mushrooms, {which I hate but thought I would give a try again for the sake of a good dinner} shallots and beef. I honestly think I’m the only person who decides to tackle a “real dinner” after 8pm. Regardless, the dinner came out quite delicious and I wanted to share it with you all…. Enjoy!

You will need: 6TBSP of butter {yes}, 1 pound of top sirloin or tenderloin cut into thin strips about an inch long, 1/3 cup of chopped shallots {this seemed like a lot, I didn’t use that much and just kinda eyeballed it}, 1/2 pound of cremini mushrooms sliced {yuck, yuck but I did it anyways. I couldn’t stand to measure them so I just chopped up half a container and called it a day}, 1/8 tsp of nutmeg, 1/2 tsp of dry tarragon and 1 cup of sour cream at room temperature. {By the way … I LOVE SOUR CREAM!}


Beef Stroganoff Ingredients


It’s actually quite simple.  You’re going to want to do all your chopping first … get your water boiling for the egg noodles. {Oh, did I mention those already? Well, you’ll want to serve this with egg noodles, potatoes or rice.} Next heat up a pan with three tbsp of butter.  The idea is to brown the meat on both sides quickly as to not dry out the middle. Make sure to salt and pepper it well while it’s doing its thing … Once you’ve browned the pieces on each side for a few minutes, put the meat in a bowl and set aside. 

Beff Stroganoff


Looks yummy doesn’t it?!  After you set aside the meat, add the extra 3 tbsp’s of butter and bring the heat down a bit.  Saute the shallots for a few minutes until tender and then take them off the heat and add them to the meat.  Do the same thing with the mushrooms.  I’m assuming that they wanted me to do these two steps separate like I just described to you … but I got a little over zealous when I was chopping and added the shallots and mushrooms to the same bowl and there was no way that I was going to sit there and pick them out … so everything got sautéed together and it turned out just fine. 

No mushrooms


Notice something missing in the picture above? …. Mushrooms perhaps?  Yes, I spent “a few” minutes chopping mushrooms that I hate because I was going to give them the benefit of the doubt, until the foodie bf came along and threw half of them down the garbage disposal. Yeah, he doesn’t care for them either.  So, the moral of the story is that Beef Stroganoff can be made with little to no mushrooms and still taste wonderful!  Next comes the good part, the sour cream.  You’re going to want to add a cup of sour cream to the mushrooms {or the mushrooms AND shallots if you combine them like me} being careful not to bring it to a boil … apparently sour cream can curdle.  {Add salt and pepper at this point if you’d like}

Beef Stroganoff Picture


Lastly, you’re going to return the meat to the pan and cook for just a bit longer to bring the meat back up to temperature from sitting patiently in that bowl.  A little note: When I browned the beef I got a lot of moisture that came out of the mean and so I had a good bit of liquid in my meat bowl. In hindsight, I added a bit to much of it to the sour cream and made it a little bit too runny for my liking.  Next time I will drain the meat, saving a bit of the liquid in case the sauce is too thick and I can add a bit in at a time.  But, that’s cooking for you … a learning process.


So there you have it my friends.  The dinner that was born from waiting on the rain to pass in the parking lot of the grocery store at 8:30pm on a Friday night.  I’m sure there are other people out there like me… it may just take me a while to find them!! {ha} Enjoy Y’all …